Linux跟踪技术之Ebpf-linux网络跟踪命令
Linux跟踪技术之Ebpf
作者:蚁景科技 2023-01-10 11:34:06系统 Linux BCC 是一个用于创建高效内核跟踪和操作程序的工具包,包括几个有用的工具和示例。它利用扩展的 BPF(Berkeley Packet Filters),正式名称为 eBPF,这是 Linux 3.15 中首次添加的新功能。BCC 使用的大部分内容都需要 Linux 4.1 及更高版本。ebpf简介
eBPF是一项革命性的技术,起源于 Linux 内核,可以在操作系统内核等特权上下文中运行沙盒程序。它可以安全有效地扩展内核的功能,而无需更改内核源代码或加载内核模块。 比如,使用ebpf可以追踪任何内核导出函数的参数,返回值,以实现kernel hook 的效果;通过ebpf还可以在网络封包到达内核协议栈之前就进行处理,这可以实现流量控制,甚至隐蔽通信。
ebpf追踪
ebpf本质上只是运行在linux 内核中的虚拟机,要发挥其强大的能力还是要跟linux kernel 自带的追踪功能搭配:
kprobeuprobetracepointUSDT通常可以通过以下三种工具使用ebpf:
bcclibbpfbpftracebcc
BCC 是一个用于创建高效内核跟踪和操作程序的工具包,包括几个有用的工具和示例。它利用扩展的 BPF(Berkeley Packet Filters),正式名称为 eBPF,这是 Linux 3.15 中首次添加的新功能。BCC 使用的大部分内容都需要 Linux 4.1 及更高版本。
源码安装bcc v0.25.0
首先clone bcc 源码仓库
git clonehttps://github.com/iovisor/bcc.gitgit checkout v0.25.0 git submodule init git submodule update
bcc 从v0.10.0开始使用libbpf 并通过submodule 的形式加入源码树,所以这里需要更新并拉取子模块
安装依赖
apt install flex bison libdebuginfod-dev libclang-14-dev
编译bcc
mkdir build && cd build cmake -DCMAKE_BUILD_TYPE=Release .. make -j #n取决于机器的cpu核心数
编译安装完成后,在python3中就能使用bcc模块了 安装bcc时会在/usr/share/bcc目录下安装bcc自带的示例脚本和工具脚本,以及manual 文档 可以直接使用man -M /usr/share/bcc/man
使用python + bcc 跟踪内核函数
bcc 自带的工具execsnoop可以跟踪execv系统调用,其源代码如下:
#!/usr/bin/python# @lint-avoid-python-3-compatibility-imports## execsnoop Trace new processes via exec() syscalls.# For Linux, uses BCC, eBPF. Embedded C.## USAGE: execsnoop [-h] [-T] [-t] [-x] [-q] [-n NAME] [-l LINE]#[--max-args MAX_ARGS]## This currently will print up to a maximum of 19 arguments, plus the process# name, so 20 fields in total (MAXARG).## This won't catch all new processes: an application may fork() but not exec().## Copyright 2016 Netflix, Inc.# Licensed under the Apache License, Version 2.0 (the "License")## 07-Feb-2016 Brendan Gregg Created this.from __future__ import print_functionfrom bcc import BPFfrom bcc.containers import filter_by_containersfrom bcc.utils import ArgString, printbimport bcc.utils as utilsimport argparseimport reimport timeimport pwdfrom collections import defaultdictfrom time import strftimedef parse_uid(user):try:result = int(user)except ValueError:try:user_info = pwd.getpwnam(user)except KeyError:raise argparse.ArgumentTypeError("{0!r} is not valid UID or user entry".format(user))else:return user_info.pw_uidelse:# Maybe validate if UID < 0 ?return result# argumentsexamples = """examples:./execsnoop # trace all exec() syscalls./execsnoop -x# include failed exec()s./execsnoop -T# include time (HH:MM:SS)./execsnoop -U# include UID./execsnoop -u 1000 # only trace UID 1000./execsnoop -u user # get user UID and trace only them./execsnoop -t# include timestamps./execsnoop -q# add "quotemarks" around arguments./execsnoop -n main # only print command lines containing "main"./execsnoop -l tpkg # only print command where arguments contains "tpkg"./execsnoop --cgroupmap mappath# only trace cgroups in this BPF map./execsnoop --mntnsmap mappath # only trace mount namespaces in the map"""parser = argparse.ArgumentParser(description="Trace exec() syscalls",formatter_class=argparse.RawDescriptionHelpFormatter,epilog=examples)parser.add_argument("-T", "--time", action="store_true",help="include time column on output (HH:MM:SS)")parser.add_argument("-t", "--timestamp", action="store_true",help="include timestamp on output")parser.add_argument("-x", "--fails", action="store_true",help="include failed exec()s")parser.add_argument("--cgroupmap",help="trace cgroups in this BPF map only")parser.add_argument("--mntnsmap",help="trace mount namespaces in this BPF map only")parser.add_argument("-u", "--uid", type=parse_uid, metavar='USER',help="trace this UID only")parser.add_argument("-q", "--quote", action="store_true",help="Add quotemarks (\") around arguments.")parser.add_argument("-n", "--name",type=ArgString,help="only print commands matching this name (regex), any arg")parser.add_argument("-l", "--line",type=ArgString,help="only print commands where arg contains this line (regex)")parser.add_argument("-U", "--print-uid", action="store_true",help="print UID column")parser.add_argument("--max-args", default="20",help="maximum number of arguments parsed and displayed, defaults to 20")parser.add_argument("--ebpf", action="store_true",help=argparse.SUPPRESS)args = parser.parse_args()# define BPF programbpf_text = """#include此工具使用kprobe和kretprobe跟踪execv系统调用的进入和退出事件,并将进程名,进程参数,pid,ppid以及返回代码输出到终端。
① 网安学习成长路径思维导图② 60+网安经典常用工具包③ 100+SRC漏洞分析报告④ 150+网安攻防实战技术电子书⑤ 最权威CISSP 认证考试指南+题库⑥ 超1800页CTF实战技巧手册⑦ 最新网安大厂面试题合集(含答案)⑧ APP客户端安全检测指南(安卓+IOS)
使用python + bcc 跟踪用户函数
bcc中使用uprobe跟踪glibc malloc 函数的工具,并统计malloc 内存的总量。
#!/usr/bin/python## mallocstacksTrace malloc() calls in a process and print the full# stack trace for all callsites.# For Linux, uses BCC, eBPF. Embedded C.## This script is a basic example of the new Linux 4.6+ BPF_STACK_TRACE# table API.## Copyright 2016 GitHub, Inc.# Licensed under the Apache License, Version 2.0 (the "License")from __future__ import print_functionfrom bcc import BPFfrom bcc.utils import printbfrom time import sleepimport sysif len(sys.argv) < 2:print("USAGE: mallocstacks PID [NUM_STACKS=1024]")exit()pid = int(sys.argv[1])if len(sys.argv) == 3:try:assert int(sys.argv[2]) > 0, ""except (ValueError, AssertionError) as e:print("USAGE: mallocstacks PID [NUM_STACKS=1024]")print("NUM_STACKS must be a non-zero, positive integer")exit()stacks = sys.argv[2]else:stacks = "1024"# load BPF programb = BPF(text="""#includelibbpf
libbpf是linux 源码树中的ebpf 开发包。同时在github上也有独立的代码仓库。 这里推荐使用libbpf-bootstrap这个项目
libbpf-bootstrap
libbpf-bootstrap是使用 libbpf 和 BPF CO-RE 进行 BPF 应用程序开发的脚手架项目 首先克隆libbpf-bootstrap仓库
git clonehttps://github.com/libbpf/libbpf-bootstrap.git
然后同步子模块
cd libbpf-bootstrap git submodule init git submodule update
注意,子模块中包含bpftool,bpftool中还有子模块需要同步 在bpftool目录下重复以上步骤
libbpf-bootstrap中包含以下目录
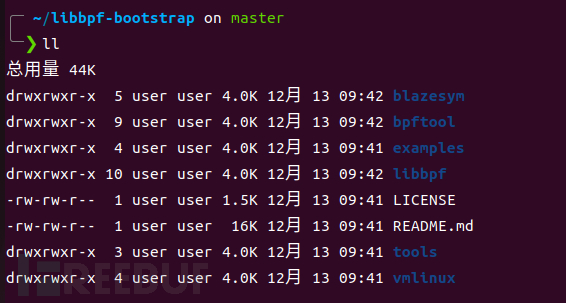
这里进入example/c中,这里包含一些示例工具 直接make编译 等编译完成后,在此目录下会生成可执行文件

先运行一下bootstrap,这里要用root权限运行

bootstrap程序会追踪所有的exec和exit系统调用,每次程序运行时,bootstrap就会输出运行程序的信息。
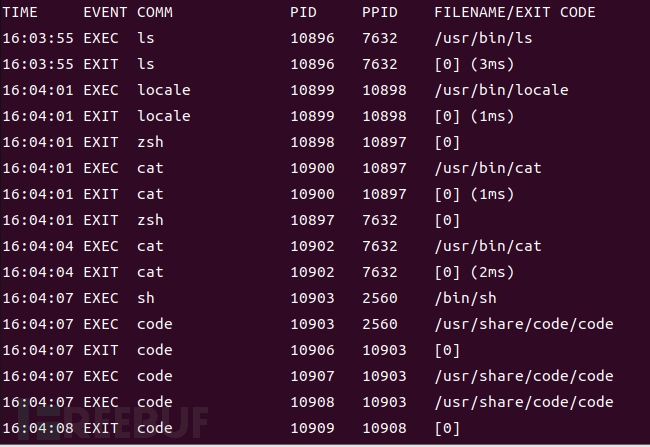
再看看minimal,这是一个最小ebpf程序。
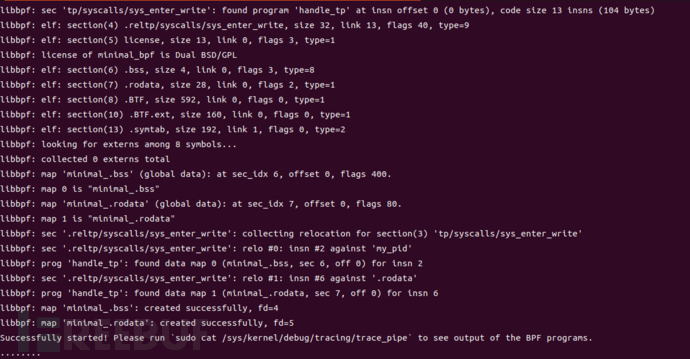
运行后输出大量信息,最后有提示让我们运行sudo cat /sys/kernel/debug/tracing/trace_pipe来查看输出 运行这个命令
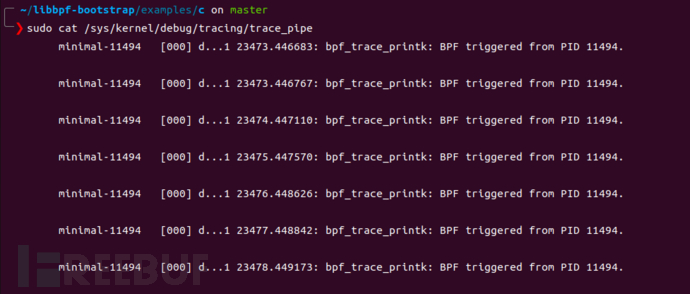
minimal 会追踪所有的write系统调用,并打印出调用write的进程的pid 这里看到pid为11494,ps 查询一下这个进程,发现就是minimal

来看看minimal的源码,这个程序主要有两个C文件组成,minimal.c和minimal.bpf.c前者为此程序的源码,后者为插入内核虚拟机的ebpf代码。
// SPDX-License-Identifier: (LGPL-2.1 OR BSD-2-Clause)#include首先看一下minimal.c的内容,在main函数中首先调用了libbpf_set_strict_mode(LIBBPF_STRICT_ALL);设置为libbpf v1.0模式。此模式下错误代码直接通过函数返回值传递,不再需要检查errno。 之后调用libbpf_set_print(libbpf_print_fn);将程序中一个自定义输出函数设置为调试输出的回调函数,即运行minimal的这些输出全都时通过libbpf_print_fn输出的。

然后在minimal.c:24调用生成的minimal.skel.h中的预定义函数minimal_bpfopen打开bpf程序,这里返回一个minimal_bpf类型的对象(c中使用结构体模拟对象)。 在31行将minimal_bpf对象的bss子对象的my_pid属性设置为当前进程pid 这里minimal_bpf对象和bss都由minimal.bpf.c代码编译而来。minimal.bpf.c经过clang 编译连接,生成minimal.bpf.o,这是一个elf文件,其中包含bss段,这个段内通常储存着minimal.bpf.c中所有经过初始化的变量。 skel->bss->my_pid = getpid();就是直接将minimal.bpf.o中的my_pid设置为minimal进程的pid。 之后在34行调用minimal_bpfload(skel);加载并验证ebpf程序。 41行调用minimal_bpfattach(skel);使ebpf程序附加到bpf源码中声明的跟踪点上。 此时ebpf程序已经开始运行了。ebpf中通过bpf_printk输出的内容会写入linux debugFS中的trace_pipe中。可以使用sudo cat /sys/kernel/debug/tracing/trace_pipe输出到终端里。 之后minimal程序会进入一个死循环,以维持ebpf程序的运行。当用户按下发送SIGINT信号后就会调用minimal_bpfdestroy(skel);卸载内核中的ebpf程序,之后退出。
接下来看minimal.bpf.c 这是ebpf程序的源码,是要加载到内核中的ebpf虚拟机中运行的,由于在运行在内核中,具有得天独厚的地理位置,可以访问系统中所有资源,再配合上众多的tracepoint,就可以发挥出强大的追踪能力。 下面是minimal.bpf.c的源码
// SPDX-License-Identifier: GPL-2.0 OR BSD-3-Clause#includeminimal.bpf.c会被clang 编译器编译为ebpf字节码,然后通过bpftool将其转换为minimal.skel.h头文件,以供minimal.c使用。 此代码中定义并初始化了一个全局变量my_pid,经过编译连接后此变量会进入elf文件的bss段中。 然后,代码中定义了一个函数int handle_tp(void *ctx),此函数中通过调用bpf_get_current_pid_tgid() >>32获取到调用此函数的进程pid
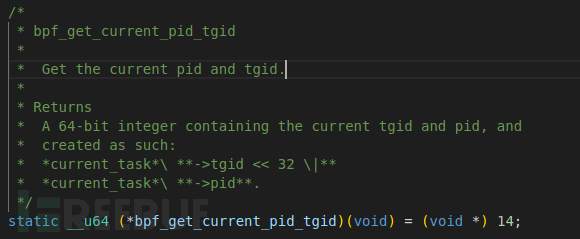
然后比较pid与my_pid的值,如果相同则调用bpf_printk输出"BPF triggered from PID %d\n” 这里由于handle_tp函数是通过SEC宏附加在write系统调用上,所以在调用write()时,handle_tp也会被调用,从而实现追踪系统调用的功能。 SEC宏在bpf程序中处于非常重要的地位。可以参考此文档SEC宏可以指定ebpf函数附加的点,包括系统调用,静态tracepoint,动态的kprobe和uprobe,以及USDT等等。 Libbpf 期望 BPF 程序使用SEC()宏注释,其中传入的字符串参数SEC()确定 BPF 程序类型和可选的附加附加参数,例如 kprobe 程序要附加的内核函数名称或 cgroup 程序的挂钩类型。该SEC()定义最终被记录为 ELF section name。
通过llvm-objdump 可以看到编译后的epbf程序文件包含一个以追踪点命名的section
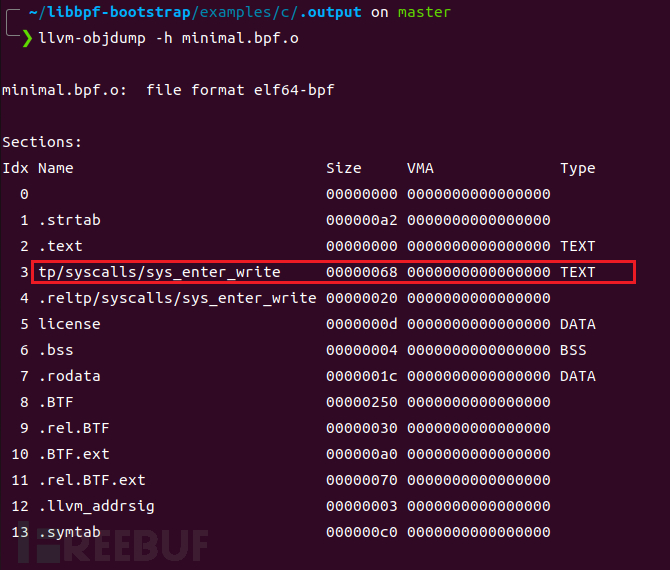
ebpf字节码dump
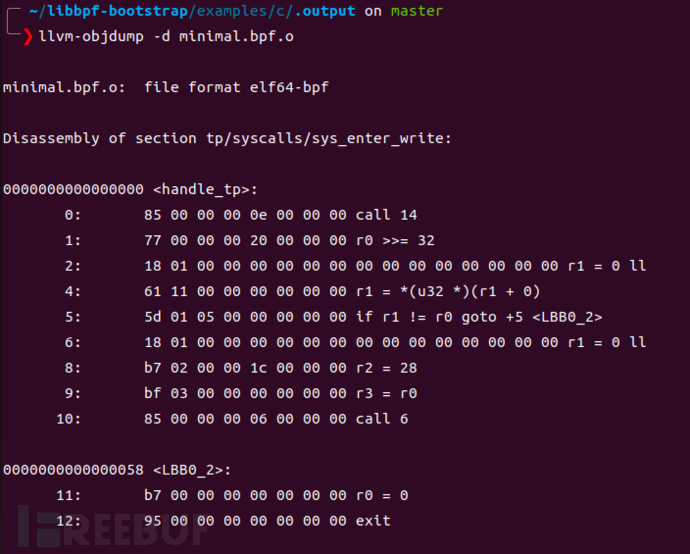
ebpf程序可以使用llvm-objdump -d dump 出ebpf字节码
bpftrace
bpftrace 提供了一种类似awk 的脚本语言,通过编写脚本,配合bpftrace支持的追踪点,可以实现非常强大的追踪功能
安装
sudo apt-get update sudo apt-get install -y \ bison \ cmake \ flex \ g++ \ git \ libelf-dev \ zlib1g-dev \ libfl-dev \ systemtap-sdt-dev \ binutils-dev \ libcereal-dev \ llvm-12-dev \ llvm-12-runtime \ libclang-12-dev \ clang-12 \ libpcap-dev \ libgtest-dev \ libgmock-dev \ asciidoctor git clonehttps://github.com/iovisor/bpftracemkdir bpftrace/build; cd bpftrace/build; ../build-libs.sh cmake -DCMAKE_BUILD_TYPE=Release .. make -j8 sudo make install
bpftrace命令行参数
# bpftraceUSAGE:bpftrace [options] filenamebpftrace [options] -e 'program'OPTIONS:-B MODEoutput buffering mode ('line', 'full', or 'none')-d debug info dry run-ddverbose debug info dry run-e 'program' execute this program-h show this help message-I DIR add the specified DIR to the search path for include files.--include FILE adds an implicit #include which is read before the source file is preprocessed.-l [search]list probes-p PID enable USDT probes on PID-c 'CMD' run CMD and enable USDT probes on resulting process-q keep messages quiet-v verbose messages-k emit a warning when a bpf helper returns an error (except read functions)-kkcheck all bpf helper functions--versionbpftrace versionENVIRONMENT:BPFTRACE_STRLEN [default: 64] bytes on BPF stack per str()BPFTRACE_NO_CPP_DEMANGLE[default: 0] disable C++ symbol demanglingBPFTRACE_MAP_KEYS_MAX [default: 4096] max keys in a mapBPFTRACE_MAX_PROBES [default: 512] max number of probes bpftrace can attach toBPFTRACE_MAX_BPF_PROGS[default: 512] max number of generated BPF programsBPFTRACE_CACHE_USER_SYMBOLS [default: auto] enable user symbol cacheBPFTRACE_VMLINUX[default: none] vmlinux path used for kernel symbol resolutionBPFTRACE_BTF[default: none] BTF fileEXAMPLES:bpftrace -l '*sleep*'list probes containing "sleep"bpftrace -e 'kprobe:do_nanosleep { printf("PID %d sleeping...\n", pid); }'trace processes calling sleepbpftrace -e 'tracepoint:raw_syscalls:sys_enter { @[comm] = count(); }'count syscalls by process namebpftrace程序语法规则
bpftrace语法由以下一个或多个action block结构组成,且语法关键字与c语言类似
probe[,probe]/predicate/ {action}probe:探针,可以使用bpftrace -l 来查看支持的所有tracepoint和kprobe探针Predicate(可选):在 / / 中指定 action 执行的条件。如果为True,就执行 actionaction:在事件触发时运行的程序,每行语句必须以 ; 结尾,并且用{}包起来//:单行注释:多行注释->:访问c结构体成员,例如:bpftrace -e 'tracepoint:syscalls:sys_enter_openat { printf("%s %s\n", comm, str(args->filename)); }'struct:结构声明,在bpftrace脚本中可以定义自己的结构bpftrace 单行指令
bpftrace -e 选项可以指定运行一个单行程序 1、追踪openat系统调用
bpftrace -e 'tracepoint:syscalls:sys_enter_openat { printf("%s %s\n", comm, str(args->filename)); }'
2、系统调用计数
bpftrace -e 'tracepoint:raw_syscalls:sys_enter { @[comm] = count(); }'
3、计算每秒发生的系统调用数量
bpftrace -e 'tracepoint:raw_syscalls:sys_enter { @ = count(); } interval:s:1 { print(@); clear(@); }'
bpftrace脚本文件
还可以将bpftrace程序作为一个脚本文件,并且使用shebang#!/usr/local/bin/bpftrace可以使其独立运行 例如:
1 #!/usr/local/bin/bpftrace23 tracepoint:syscalls:sys_enter_nanosleep4 {5 printf("%s is sleeping.\n", comm);6 }bpftrace探针类型
bpftrace支持以下类型的探针:
kprobe- 内核函数启动kretprobe- 内核函数返回uprobe- 用户级功能启动uretprobe- 用户级函数返回tracepoint- 内核静态跟踪点usdt- 用户级静态跟踪点profile- 定时采样interval- 定时输出software- 内核软件事件hardware- 处理器级事件 责任编辑:武晓燕 来源:FreeBuf.COM linux跟踪技术工具推荐系统
电脑公司Ghost Win8.1 x32 精选纯净版2022年7月(免激活) ISO镜像高速下载
语言:中文版系统大小:2.98GB系统类型:Win8电脑公司Ghost Win8.1x32位纯净版V2022年7月版本集成了自2022流行的各种硬件驱动,首次进入系统即全部硬件已安装完毕。电脑公司Ghost Win8.1x32位纯净版具有更安全、更稳定、更人性化等特点。集成最常用的装机软件,精心挑选的系统维护工具,加上绿茶独有
微软Win11原版22H2下载_Win11GHOST 免 激活密钥 22H2正式版64位免费下载
语言:中文版系统大小:5.13GB系统类型:Win11微软Win11原版22H2下载_Win11GHOST 免 激活密钥 22H2正式版64位免费下载系统在家用办公上跑分表现都是非常优秀,完美的兼容各种硬件和软件,运行环境安全可靠稳定。Win11 64位 Office办公版(免费)优化 1、保留 Edge浏览器。 2、隐藏“操作中心”托盘图标。 3、保留常用组件(微软商店,计算器,图片查看器等)。 5、关闭天气资讯。
Win11 21H2 官方正式版下载_Win11 21H2最新系统免激活下载
语言:中文版系统大小:4.75GB系统类型:Win11Ghost Win11 21H2是微软在系统方面技术积累雄厚深耕多年,Ghost Win11 21H2系统在家用办公上跑分表现都是非常优秀,完美的兼容各种硬件和软件,运行环境安全可靠稳定。Ghost Win11 21H2是微软最新发布的KB5019961补丁升级而来的最新版的21H2系统,以Windows 11 21H2 22000 1219 专业版为基础进行优化,保持原汁原味,系统流畅稳定,保留常用组件
windows11中文版镜像 微软win11正式版简体中文GHOST ISO镜像64位系统下载
语言:中文版系统大小:5.31GB系统类型:Win11windows11中文版镜像 微软win11正式版简体中文GHOST ISO镜像64位系统下载,微软win11发布快大半年了,其中做了很多次补丁和修复一些BUG,比之前的版本有一些功能上的调整,目前已经升级到最新版本的镜像系统,并且优化了自动激活,永久使用。windows11中文版镜像国内镜像下载地址微软windows11正式版镜像 介绍:1、对函数算法进行了一定程度的简化和优化
微软windows11正式版GHOST ISO镜像 win11下载 国内最新版渠道下载
语言:中文版系统大小:5.31GB系统类型:Win11微软windows11正式版GHOST ISO镜像 win11下载 国内最新版渠道下载,微软2022年正式推出了win11系统,很多人迫不及待的要体验,本站提供了最新版的微软Windows11正式版系统下载,微软windows11正式版镜像 是一款功能超级强大的装机系统,是微软方面全新推出的装机系统,这款系统可以通过pe直接的完成安装,对此系统感兴趣,想要使用的用户们就快来下载
微软windows11系统下载 微软原版 Ghost win11 X64 正式版ISO镜像文件
语言:中文版系统大小:0MB系统类型:Win11微软Ghost win11 正式版镜像文件是一款由微软方面推出的优秀全新装机系统,这款系统的新功能非常多,用户们能够在这里体验到最富有人性化的设计等,且全新的柔软界面,看起来非常的舒服~微软Ghost win11 正式版镜像文件介绍:1、与各种硬件设备兼容。 更好地完成用户安装并有效地使用。2、稳定使用蓝屏,系统不再兼容,更能享受无缝的系统服务。3、为
雨林木风Windows11专业版 Ghost Win11官方正式版 (22H2) 系统下载
语言:中文版系统大小:4.75GB系统类型:雨林木风Windows11专业版 Ghost Win11官方正式版 (22H2) 系统下载在系统方面技术积累雄厚深耕多年,打造了国内重装系统行业的雨林木风品牌,其系统口碑得到许多人认可,积累了广大的用户群体,雨林木风是一款稳定流畅的系统,一直以来都以用户为中心,是由雨林木风团队推出的Windows11国内镜像版,基于国内用户的习惯,做了系统性能的优化,采用了新的系统
雨林木风win7旗舰版系统下载 win7 32位旗舰版 GHOST 免激活镜像ISO
语言:中文版系统大小:5.91GB系统类型:Win7雨林木风win7旗舰版系统下载 win7 32位旗舰版 GHOST 免激活镜像ISO在系统方面技术积累雄厚深耕多年,加固了系统安全策略,雨林木风win7旗舰版系统在家用办公上跑分表现都是非常优秀,完美的兼容各种硬件和软件,运行环境安全可靠稳定。win7 32位旗舰装机版 v2019 05能够帮助用户们进行系统的一键安装、快速装机等,系统中的内容全面,能够为广大用户
相关文章
- Win7的电脑屏幕如何去进行优化?
- 出资2000万美元!谷歌将在全美推广免费网络安全诊所
- Win10 Microsoft管理控制台停止工作的处理办法
- 微软 Teams 推出 Payments 支付应用预览版:视频会议中“打钱” - IT之家
- Win7电脑设置工作组的办法
- windows windows
- 【记1】双系统重装win7后无法进入ubu双系统无法进入win7ntu
- dellwin10安全模式怎么退出 dellwin10安全模式退出教程【详解】
- Adobe Premiere Pro 将引入新 AI 工具 可一句话改变视频季节 - IT之家
- 电脑一键安装系统(支持GTP)
- 3星笔记本ghost win7 64最新系统推荐
- 教大家使用迷你KMS工具激活Win 8系统
- 守护者计划教你如何远程反诈防骗?
- 如何在 Rocky Linux 9 / AlmaLinux 9 上安装 KVM
- 因导致其它问题 微软撤回修复 LSA 误报的 4 月更新
- 14寸笔记本预装Windows With Bing免费版
- 死亡搁浅延迟高/卡顿/掉线/闪退/丢包/崩溃/进不去游戏解决方法
- win10硬件加速打还是关介绍
热门系统
- 1华硕笔记本&台式机专用系统 GhostWin7 32位正式旗舰版2018年8月(32位)ISO镜像下载
- 2深度技术 Windows 10 x86 企业版 电脑城装机版2018年10月(32位) ISO镜像免费下载
- 3雨林木风 Ghost Win7 SP1 装机版 2020年4月(32位) 提供下载
- 4电脑公司 装机专用系统Windows10 x86喜迎国庆 企业版2020年10月(32位) ISO镜像快速下载
- 5深度技术 Windows 10 x86 企业版 六一节 电脑城装机版 版本1903 2022年6月(32位) ISO镜像免费下载
- 6深度技术 Windows 10 x64 企业版 电脑城装机版2021年1月(64位) 高速下载
- 7新萝卜家园电脑城专用系统 Windows10 x64 企业版2019年10月(64位) ISO镜像免费下载
- 8新萝卜家园 GhostWin7 SP1 最新电脑城极速装机版2018年8月(32位)ISO镜像下载
- 9电脑公司Ghost Win8.1 x32 精选纯净版2022年5月(免激活) ISO镜像高速下载
- 10新萝卜家园Ghost Win8.1 X32 最新纯净版2018年05(自动激活) ISO镜像免费下载
热门文章
常用系统
- 1深度技术 GHOST WIN10 X64 电脑城装机版 V2019.03 下载
- 2电脑公司Ghost Win10 x86 专业版v2023.06最新下载
- 3雨林木风 Ghost Win10 32位 专业精简版下载_雨林木风 Ghost Win10 32位镜像下载
- 4Windows XP纯净版下载_WinXP SP3纯净版系统安装下载
- 5Win10专业版官方下载_Windows10 64位专业稳定版下载
- 6雨林木风Ghost Win10 64位 快速专业版 v2023.06最新免费下载
- 7深度技术 Ghost Win7 x64 Sp1 电脑城装机版2018年10月(64位) ISO镜像快速下载
- 8新萝卜家园 GhostWin7 SP1 电脑城极速稳定版2021年11月(32位) ISO镜像高速下载
- 9电脑公司 装机专用系统Windows10 x86新春特别 企业版 版本1507 2022年2月(32位) ISO镜像快速下载
- 10电脑公司 GHOST WIN10 X64 最新正式版_电脑公司Win10 22H2专业版下载

